Friday, April 1, 2011

How to compress images in Word and Powerpoint

Inserted images in Word and Powerpoint may appear small, but they are actually stored as their original size unless compressed. This can cause printing to take a long time and needlessly increase file sizes. Thankfully there is a way to compress images in both these applications.

Office 2000, XP and 2003

Open the view menu and select 'Pictures' from the 'Toolbars' sub-menu. The picture toolbar, as shown below, should appear.

Click on the 'Compress pictures' icon (highlighted in orange on the above picture).
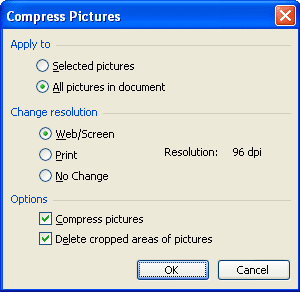
This opens the following window.


Select 'Web/Screen' for the highest level of compression, or 'Print' for a lower level. Make sure that 'Apply to' is set to 'All pictures in document', and click 'OK'.

You may then receive the following warning. If you do, click the 'Apply' button.


Office 2007 and 2010


Click on any image to enable 'Picture Tools', and click the 'Format' tab shown below.


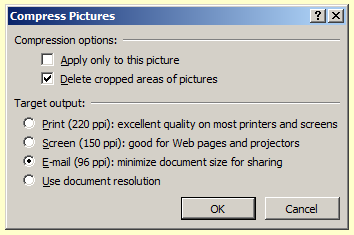
Click the 'Compress Pictures' button (highlighted in orange on the above picture), to open the following window.

Select whichever level of compression best suits your purposes. Make sure that 'Apply only to this picture' is not selected, and click the 'OK' button.

Wednesday, March 30, 2011

Word of Mouth: Introducing Voice Search for Indonesian, Malaysian and Latin American Spanish

(Read more about the launch of Voice Search in Latin American Spanish on the Google América Latina blog)

Today we are excited to announce the launch of Voice Search in Indonesian, Malaysian, and Latin American Spanish, making Voice Search available in over two dozen languages and accents since our first launch in November 2008. This accomplishment could not have been possible without the help of local users in the region - really, we couldn’t have done it without them. Let me explain:

In 2010 we launched Voice Search in Dutch, the first language where we used the “word of mouth” project, a crowd-sourcing effort to collect the most accurate voice data possible.The traditional method of acquiring voice samples is to license the data from companies who specialize in the distribution of speech and text databases. However, from day one we knew that to build the most accurate Voice Search acoustic models possible, the best data would come from the people who would use Voice Search once it launched - our users.

Since then, in each country, we found small groups of people who were avid fans of Google products and were part of a large social network, either in local communities or on online. We gave them phones and asked them to get voice samples from their friends and family. Everyone was required to sign a consent form and all voice samples were anonymized. When possible, they also helped to test early versions of Voice Search as the product got closer to launch.

Building a speech recognizer is not just limited to localizing the user interface. We require thousands of hours of raw data to capture regional accents and idiomatic speech in all sorts of recording environments to mimic daily life use cases. For instance, when developing Voice Search for Latin American Spanish, we paid particular attention to Mexican and Argentinean Spanish. These two accents are more different from one another than any other pair of widely-used accents in all of South and Central America. Samples collected in these countries were very important bookends for building a version of Voice Search that would work across the whole of Latin America. We also chose key countries such as Peru, Chile, Costa Rica, Panama and Colombia to bridge the divergent accent varieties.

As an International Program Manager at Google, I have been fortunate enough to travel around the world and meet many of our local Google users. They often have great suggestions for the products that they love, and word of mouth was created with the vision that our users could participate in developing the product. These Voice Search launches would not have been possible without the help of our users, and we’re excited to be able to work together on the product development with the people who will ultimately use our products.

Thursday, March 24, 2011

Keyboard shortcut of the week: Windows 7 Taskbar

After a long hiatus, keyboard shortcut of the week returns to 'Bloody Computer!' This week, we will look at new features of the Windows 7 taskbar.

You can open any program on the taskbar by holding the Windows key [shown right] and pressing the item number on the taskbar. For example, to open Internet Explorer on the following taskbar you would press Windows Key + 1. The calculator is Windows Key + 2, and so on.


If Internet Explorer is already running, pressing Windows Key + 1 will open that session. To start a new instance of the web browser press Shift + Windows Key + 1.

You can also shift focus to the taskbar using Windows Key + T. You can then use the left and right cursor keys to cycle through the items and press Enter to open them.

You can pin new programs to the taskbar by right-clicking on the icon and selecting 'Pin this program to the taskbar'. Once the icon is pinned, you can drag and drop it anywhere you like on the taskbar.

Monday, March 21, 2011

Explore the world with updated apps for iPhone: Check in with Latitude and use Places in 30 languages

We’re happy to announce updates for two iPhone apps that help you connect the people you care about with the places you love: Google Latitude with check-ins and Google Places in 30 languages.

Check in with Google Latitude for iPhone
After adding check-ins to Google Latitude for Android-powered devices, we’re happy to announce that you can now start checking in at places with the updated Latitude app for iPhone.

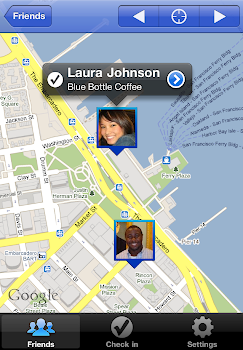
With Google Latitude, you can see where your Latitude friends are on a map and choose to continuously share where you are. Now, you can also choose to check in at specific places, such as your favorite restaurant or a park, to add more context to your location. You'll be able to not only let friends know that you’re just around the corner but also let them know the actual coffee shop that you’re at in case they want to join you. If Latitude is set to continuously update your location, you’ll also be automatically checked out when you leave. This way, friends aren’t left guessing if you’re still there or not before heading over to join you for a latte.


Tap the “Check in” button to start checking in at nearby places. Keep checking in every time you visit your favorite places to start gaining special status there. You’ll not only progress to become a Regular, VIP, and then Guru at your favorite places, but if you’re near Austin, Texas, gaining status lets you unlock check-in offers at over 60 places.

Just like with sharing your location, you can control your Latitude check-in privacy. Checking in is 100% opt-in, and you can choose to share any check-in with your friends on Latitude, publicly on the web and your Google profile, or just yourself.

To start checking in with Latitude on your iPhone, update the Latitude app from the App Store. The app requires iOS 4 and above, and it's available for iPhone 3GS, iPhone 4, iPad, and iPod touch (3rd/4th generation). However, background location updating is only available on the iPhone 3GS, iPhone 4, and iPad 3G.

Google Places in 30 languages
Best ever! Me gusta! Mi piace! Ich liebe es! Wherever you are and whatever language you speak, we want to give you the best personalized place recommendations when you use Google Places with Hotpot. Update the Google Places app from the App Store to rate on the go and get personalized recommendations for places in 30 languages.


You’ll also have one more way to personalize your experience: saved places. Sign in with your Google Account using the info icon in the top left corner. Then, tap the new “Saved” icon on the app’s main screen to see all the places that you’ve saved or starred from the app, google.com/hotpot or maps.google.com.

Updates will appear in the App Store in supported countries throughout today. Get the latest version of Google Places from the App Store and start discovering great new places wherever you are!

Introducing Nexus S 4G for Sprint

Recently, we introduced Nexus S from Google, the first phone to run Android 2.3, Gingerbread. In addition to the UMTS-capable Nexus S, today we’re introducing Nexus S 4G from Google, available for Sprint. Nexus S 4G is part of the Nexus line of devices which provide a pure Google experience and run the latest and greatest Android releases and Google mobile apps.

We co-developed Nexus S 4G with Samsung to tightly integrate hardware and software and highlight the advancements of Gingerbread. Nexus S 4G takes advantage of Sprint’s high-speed 4G data network. It features a 4” Contour Display designed to fit comfortably in the palm of your hand and along the side of your face. It also features a 1GHz Hummingbird processor, front and rear facing cameras, 16GB of internal memory, and NFC (near field communication) hardware that lets you read information from everyday objects that have NFC tags.

In addition, today we’re excited to announce that Sprint customers will soon be able to take advantage of the full set of Google Voice features without changing or porting their number.

You can find more Nexus S information and videos at google.com/nexus or follow @googlenexus on Twitter for the latest updates. Nexus S 4G can be purchased this spring online and in-store from Sprint retailers and Best Buy and Best Buy Mobile stores in the U.S.


Posted by Andy Rubin, VP of Engineering

Wednesday, March 16, 2011

How to print two pages per sheet

Cutting down on the amount of paper used in printing not only saves money, but is also more environmentally friendly. Some applications offer the option of printing multiple pages per sheet of paper. In this post I will show you how to print two pages per sheet in MS Word and Adobe Acrobat Reader.

MS Word
Open the print dialogue from the 'File' menu in older versions of Word, or by clicking the Office Button in newer versions (as shown below).


Simply set 'Pages per sheet' to '2 pages' and click 'OK'.


Adobe Acrobat
Open the print dialogue from the 'File' menu.
Change 'Page Scaling' to 'Multiple pages per sheet' and 'Pages per sheet' to '2'.


OpenOffice
I found no easy way to print two pages per sheet in OpenOffice, but you can save the file as a pdf using the 'Export as PDF' tool in the 'File' menu and then open it in Adobe Acrobat and follow the above instructions.

Tuesday, March 15, 2011

Google Search app for iPhone—a new name and a new look

If you need to do a Google search on your iPhone or iPod touch it's now faster and easier when you use our redesigned Google Search app, formerly Google Mobile App. If you've been using Google Mobile App for a while, you'll notice that things look different.

The redesigned home screen of Google Search app.


First, you’ll see that there are now more ways to interact with the app. When browsing through search results or looking at a webpage, you can swipe down to see the search bar or change your settings. For those who use other Google apps, there’s an Apps button at the bottom of the screen for rapid access to the mobile versions of our products.

We also included a new toolbar that will make it easier for you to filter your results. You can open this toolbar by swiping from left to right — either before you search or once you’ve got your results. If you only want images, just tap “Images,” and the results will update as shown:


The toolbar helps you to get to the right kind of results.

Second, we’ve made it easier to pick up searching where you left off. If you leave the app and come back later, you’ll be able either to start a new search right away (just tap in the search box to type, hit the microphone button to do a voice search or tap on the camera icon to use Google Goggles) or get back to exactly where you were by tapping on the lower part of the page.

Finally, there are a number of improvements we’ve made to everything else you love in the app, including Google Goggles, Voice Search, Search with My Location, Gmail unread counts and more. There's a lot in the app, so we've added a simple help feature to let you explore it. Access this by tapping the question mark above the Google logo.

The help screen can be accessed from anywhere in Google Search app.


Download and try Google Search app today; it’s available free from the iTunes App Store. You can also scan the QR code below.