When copying charts into a word processor, whether in Microsoft Office from Excel to Word or in openoffice.org from Calc to Writer, the software embeds a special object that links back to the original spreadsheet. If you then change the details in the Excel spreadsheet the chart in the Word document will change accordingly. In many cases this is advantageous; however, it can cause problems if the Word document cannot 'see' the Excel file, for example, if you email the Word file to someone without the Excel file. It is generally better to paste the chart as an image in the first place using the 'Paste special' facility.
I will start by explaining how to do this in Microsoft Office:
Once you have created your chart in Excel you select it and copy it, as shown here.
In older versions of Word you pull down the 'Edit' menu and select 'Paste Special'. You may have to wait a moment for all the menu items to be revealed.
In the latest versions of Word, 'Paste special' is in a menu underneath the 'Paste' button.
A box will open, from which you select 'Picture (Enhanced Metafile)', and click OK.
This will then insert the chart as a picture, which you can manipulate like any other imported image.
In openoffice.org, the procedure is pretty much the same as above, with 'Paste special' is in the 'Edit' menu, or alternatively you can use a keyboard shortcut: Ctrl + Shift + V. The major difference from above is that the following box will open when you select 'Paste special'. Simply select 'Bitmap' and click OK to paste the chart as a picture.
Friday, May 28, 2010
How to copy charts into a word processor
Thursday, May 27, 2010
Google Buzz for mobile now available on more devices
Back in February, we launched Google Buzz for mobile, a tool to start interesting conversations when you are out and about. One of the most popular ways to access Google Buzz for mobile is through the web application (by going to buzz.google.com in your phone’s browser). When Buzz launched, it was only available for devices running Android 2.0+ and iPhone. Not any more! Today we’re a releasing an XHTML version of the Buzz website which can be accessed from many other mobile devices, including those running Android pre-2.0, Blackberry, Nokia S60, and Windows Mobile.
Just type buzz.google.com in your browser. Then when you log in using your password, you will be able to view the stream of buzz posts, post publicly or privately, comment or like a post, and more. On the BlackBerry platform, you can also enable location through your browser settings. This will allow you to get to the Nearby view, where you’ll find geo-tagged posts near you. In addition, you can tag your post with your location. Please note that location features might not work on some devices.
Android pre-2.0 devices can now run the same web app as newer versions of Android. You can also switch to the XHTML version if needed, and we will remember your preference.
We have worked hard to make Google Buzz for mobile accessible on more devices in more locations. It is now available in 37 languages through buzz.google.com and we’re excited to bring it to mobile devices with browsers that don’t support the HTML5 capabilities the webapp uses. We hope that you enjoy using Google Buzz on the go!
Posted by Alex Kennberg, Software Engineer, Google Mobile
Update 5/27/2010 11:17: This new webpage is also functional on Palm WebOS phones.
Labels:
android,
BlackBerry,
buzz for mobile,
nokia,
palm webos,
windows mobile
Wednesday, May 26, 2010
Where Have I Been? Get Your Answer with the Google Location History Dashboard
When I was young, I used to imagine that there was a string attached to me, and that one day I’d be able to see my whole life’s travels laid out on a globe. Thanks to my phone, Google Latitude, and Google Location History, I’ve been able to pull a virtual string behind me for a few months. Alas, I can’t entertain myself for too long with just a piece of string. Today we’re launching an experimental new view in Beta for Google Location History to visualize your location history in a different -- and hopefully more interesting -- way than just a string of locations.
If you’ve already chosen to enable Location History, the new dashboard view will try to highlight interesting trends from your existing location history, such as trips you’ve taken, places you’ve visited, time spent at home vs. out, and more. Ever wonder how much time you’ve spent at work recently compared to six months ago, or where it was that you stopped on your last road trip? Just check out Location History for some of the answers.
For example, I took a look at my dashboard, and it reminded me that my brother and I watched the Oakland A’s win on the final at-bat on April 17th.
If you’re a road warrior like me, the dashboard can help you remember your trips and where you stopped along the way. Here’s an example of a trip I took to New York to get a little work done and visit some friends just west of Central Park.
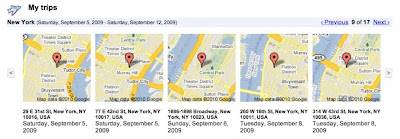
Speaking of being a road warrior, sometimes I do wonder how long my string is. I at least know how long it is since I started using Latitude and Location History -- about 21,000 miles or 10% of the distance to the moon!
We’re really excited to make Latitude and your location more useful to you, but we definitely understand that your privacy is important. Just as before, Google Location History is entirely opt-in only and your location history is available privately to you and nobody else. Additionally, you may be asked to periodically re-enter your password when opening any Location History page, even if you’re signed in to your Google Account already (just to make sure you’re really you). Of course, you may always delete any or all of your location history in the Manage History tab or disable Location History at any time.
To try out the new dashboard yourself, enable Google Latitude in the background on your phone, turn on Google Location History, and wait a few days (up to a week) to build up enough history for the dashboard to begin showing information. This is just one interesting way you can do more with your location, but we don’t expect it to be the last. With last week’s launch of the Google Latitude API, we hope to soon see people create even more cool ways for you to choose how to use your location and location history.
The Location History dashboard’s information is still experimental and in Beta so you may notice some initial issues with accuracy around its estimates. We’re working on improving the Location History dashboard and Latitude location updating overall, so you’ll notice improvements for both over time. You may also want to try turning on WiFi or GPS on your phone to improve location history accuracy. Visit our Help Center to learn more or tell us your feedback and questions in our Help Forum. Give us suggestions and vote on other people’s on the Mobile Product Ideas page!
Posted by Andrew Kirmse and Kenny Leftin, Software Engineers, Google Mobile Team
Monday, May 3, 2010
How to open a non-linked web address in Firefox
While most web addresses on sites are clickable links, you will have noticed that some are just text that you have to copy and paste into the address bar of your browser. Alternatively, Firefox offers you the facility drag and drop these into a new tab. Simply highlight the address, click on it and while holding down the mouse button drag it up onto the tab bar. Firefox will then automatically open the page in a new tab. I have included a video of this function to show you what I mean.
Subscribe to:
Posts (Atom)